|
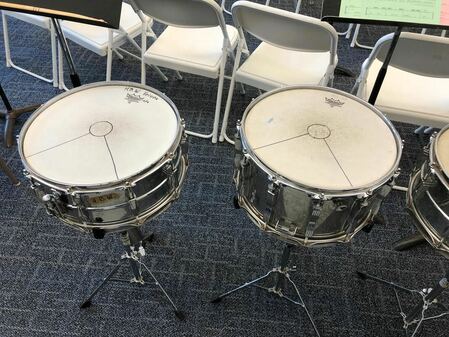
Tip #1 Having trouble with your percussionists' sticks flying out of control when they play snare drum? Using a permanent marker, outline a small circle (1-3 inches) in the center of the drum head. From there trace lines to the rim to guide their hand position. This will help them focus on where to place their hands and find the optimal beating spot. Tip #2 Our group rehearses in a carpeted room, however we perform in a "gymnatorium" with hardwood floors. As a result the percussionists have a huge adjustment to make, particularly on snare drum. What sounds good in the band room is WAY too loud in our performance space.
The solution? A drum rug (or a small piece of carpet) under the snare drums makes a dramatic difference. The percussionists are able to achieve a better balance and don't have to work so hard to play softer. No one notices the rug is there since it is on the floor in the back of the ensemble, but it soaks up enough of the sound that the drums are not overpowering. Bonus Tip Whenever you change a snare head use a permanent marker to write the date near the edge. That way you will know how long the head has been on the drum and will have a better idea of when to change it again.
1 Comment
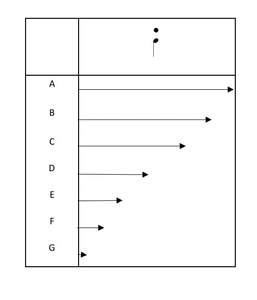
In my classroom we define staccato as "separated." In other words, there will be a space between the staccato note and whatever comes next. How much space? Well.... Too often students develop a mental image of staccato notes as "short," or "stabbed." This frequently leads to a sound that is not characteristically appropriate. To help students conceptualize what a staccato note should sound like I will draw this diagram on the board. Assume the column's width represents a beat in 4/4, the arrows represent sound, and the music has a staccato quarter note. Which of the following would you consider to be staccato? Students will vote for the arrow(s) they think are correct. Then I will ask "which ones are separated?" Of course arrow A is not, so clearly that is not staccato. But the rest are all separated to various degrees. So according to our definition, B through G are all staccato.
Next I will ask "which one is the correct staccato?" Again, students will vote for different ones, mostly C or D. This leads to a brief discussion of what makes a particular note=length correct. Most students would say that G is too short. But it might be appropriate in a latin-jazz tune for a note with a carrot top. Some might say that B isn't separated enough. But it might be a good choice for a staccato note in a slow, lyrical passage. We discuss the various elements that contribute to making a good choice (style, tempo, etc.). The conclusion is that any one of them could be correct depending on the situation. To drive the point home I will put on a metronome at a moderately slow tempo and try to sing or play a measure of each articulation. Students experience the space between notes expanding as they listen and try to match each other. At this point they have learned to put a great deal of thought into the length of each note. Summing it Up When staccato is taught this way students learn to think about it as a musical concept rather than a rule to be followed. Students learn that when they see a staccato in their music it represents an idea that is subject to interpretation. By using this approach you will encourage your students to be thoughtful, engaged musicians. Each year I ask my clarinet and saxophone students, "How would you like to sound better on your instrument instantly without making any effort?" Of course the way to do this is to upgrade from a beginner stock mouthpiece.
The difference between a decent mouthpiece and the one that comes with a student instrument is dramatic. When students hear the difference in their sound they enjoy playing even more, which often leads to increased practicing. Also, if parents purchase the mouthpiece they become more invested in their child's music-making and are more likely to encourage practicing. Using a better mouthpiece not only motivates students, it is critical for their musical development. Particularly when they begin expanding their range and developing their upper register. So how do I get my students to upgrade? 1. Mouthpiece Tryout Day Every November I reach out to our music store rep and ask him to bring a variety of quality clarinet and saxophone mouthpieces ranging from $25-100. Each student comes to the band room when they are available to play on each one. I have a preset letter to the parents explaining why having a good mouthpiece matters, and listing the model and price for the one each student chooses. If it is an expensive one I will usually list a second choice. Of course the mouthpieces are sanitized before each student tries them. Why November? This is when people start thinking about holiday gifts! Contact me if you would like a list of mouthpieces we recommend. 2. Build an inventory of good mouthpieces Start buying good quality mouthpieces that you can lend out to students who aren't able to buy one themselves. If you buy a couple each year and take good care of them you will be able to outfit your entire section within a few years. Use mouthpiece patches to protect them and be sure to keep track of them. Some of my students actually bought their own after using the school's mouthpiece for a few weeks. This allowed me to loan it out again and have more students playing on good equipment. 3. While you're at it... When students and parents are in the process of upgrading mouthpieces I use the opportunity to remind them of the importance of using quality reeds and a good ligature. We also recommend using a reed case and rotating 3-5 good reeds. Encouraging students to upgrade their mouthpieces has helped many of my students improve their performance and enjoy band even more. Not to mention the band sounds better too! |
Tips for Band TeachersPractical ideas for your elementary and middle school band class. Archives
August 2019
Categories
All
|
© Dan Halpern Music 2023 All Rights Reserved


 RSS Feed